If, like yours truly, you have just taken possession of a swanky “new” (by Kenyan standards) Mazda Axela (also known as the Mazda 3 everywhere in the world except Japan), then it is worth noting that there are some interesting software add-ons that await you that you probably didn’t know existed.
In my case, I was coming from the 2013 model of the same car and, as I have shared before, there, I had access to an aftermarket head unit that I had installed for the sole purpose of being able to explore and use Android Auto. So, obviously, it goes without saying that I’d be itching to have a similar setup, if possible, on my “new” car, right?
That expectation led me down a rabbit hole and that is why you are here…
Before you get to enjoy turn-by-turn navigation using the Google Maps app on your phone projected on the infotainment unit on your Mazda Axela, you will have to go through a rather rigorous software, and, later on, hardware, upgrade process.
The Software
We start with the software.
Here’s what you will need:
- A USB 2.0 flash drive – 32GB or below (preferred: 8GB disk)
- The software upgrade files – more on that in a moment but you can find what you need to move from any version after 30 to 70 .
- A computer – from where you will download and transfer the software upgrade files to the flash drive.
Key considerations/things you need to know
- Make sure the USB flash drive is formatted to FAT32 format. (Preferred: using a Windows PC to format and transfer the necessary software upgrade file. This is so that no hidden files make it to the flash drive. If using macOS and other platforms, do the process in such a way that no hidden files make it to the drive. When transferring the software upgrade files, select them, and copy and paste them into the new location (the drive). Don’t drag and drop. Please make sure the files you copy to the USB flash drive are in .up format. Don’t transfer compressed/zipped files as the car system won’t recognize them).
- Flash drive capacity shouldn’t exceed 32GB. 8 or 16GB units are recommended.
- Mazda has four regions for its software releases: ADR (Australia Designated Region), which covers Australia, South America, South Africa and others, Europe (EU), Japan (JP), and North America (NA) which covers Canada, Mexico and the United States. You will need to identify which region you want to use its software. The most common advice is to use software from your own region. However, since things like the built-in maps and navigation service don’t work in Kenya and pretty much anywhere in Africa, we are free to go with other regions in addition to ADR, which covers South Africa. JP software is hard to find and, as such, I recommend that one only considers EU and NA in addition to ADR.
- Most cars in Kenya are imported from the Japanese domestic market and, as such, arrive running the JP software and everything is in Japanese. This is the Mazda Axela we are talking about. There are some who have the Mazda 3, what the Axela is known as outside Japan, from Singapore and other foreign markets. At least on paper, regardless of trim, these are the same cars with differences being in what Mazda offers each market where whatever model of the car you have came from. For instance, Japanese Axelas have a DVD tray while the Mazda 3s sold elsewhere outside Japan may or may not have it. What this means is that, if you are attached to multimedia playback via the DVD tray, you may want to stick with a version of the software (JP) that doesn’t render that useless though, from our own experimentation, we have found that the European software handles that just as fine.
- Make sure your car’s battery is fully charged. The process will drain the battery faster so this is important so that the battery doesn’t give up in the middle of the update process. Recommended: if you are doing a two or three-stage upgrade process, consider doing each after a long drive when your battery has fully charged instead of in one sitting where you risk bricking the CMU (Control Master Unit) in your car’s infotainment system or needing to jumpstart the car at the end of the process.
- Make sure the air conditioning (AC) is turned off.
- Make sure the lights are turned off. Turned off, not headlights put on Auto.
- “BM” as captured in the title of this article refers to the car’s generation. The BM Mazda 3/Axela is the third generation Mazda 3/Axela. There is a first generation (BK) and a second generation (BL) like my old 2013 car. This third generation is shared between two models: there is the BM like the one we are referencing to in this article and there is the BN model which follows it. They all belong to the third generation and share much in the way of looks, features, parts and functionality. I won’t go into further details beyond those. There’s a fourth generation which is where we find the BP model that has a redesign and whose users will never know the struggles like the ones you are about to undergo below as they arrive from the factory with Android Auto and all the nice software features on the ready.
The process
(Some of the bits of this process may be repeated from the introductory part above. Don’t worry, this is all meant to make sure you don’t skip any step).
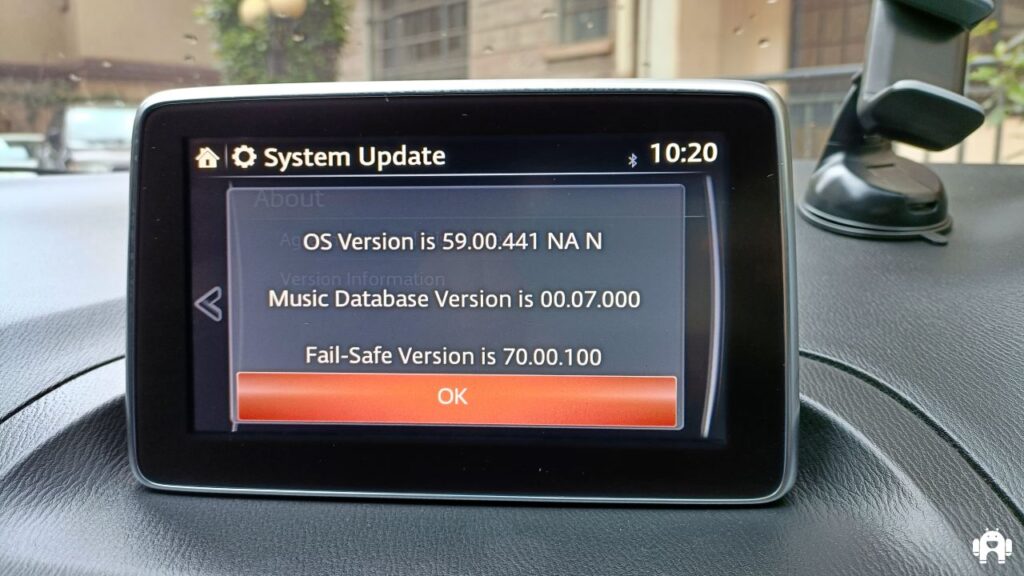
- Check the software that is currently installed on your car’s infotainment system (Mazda Connect) and take note of it. If it is less than version 31.0.0.0 (i.e. version 27, 28, 29, 30 or earlier) then you will need to upgrade it to version 31 first before proceeding. If it is more than version 30 i.e. version 31 and later, then you can upgrade straight away to version 70 (70.0.0.100). From there, you can install any later version 70 updates as you please. Where all the conditions are met, your choice of software version may only be limited by the region you choose to go with. Version 70 is what we need in order to get Android Auto working.

- After working out what your software is and what you will need, download what you will need () or the exact software version if you’re not moving up to version 70 as is our case in this tutorial.
- On a Windows computer, format the USB flash drive (make sure it is USB 2.0 and not 3.0 as the USB hub in the Mazda Axela, before you upgrade it later in this tutorial, is only 2.0) to FAT32.
- Download the files whose link is shared above and transfer them to the flash drive in .up format. The car’s system can’t read zipped files so make sure the files are copied to the base/root of the flash drive as they are (.up format). In this case, just go with the .100A failsafe and reinstall package files first in the flash drive. After you’re done with the update process is when you can delete them, reformat the USB drive and download and copy the 367A update file. However, if you have enough storage on your flash drive, just go ahead and do it.
- Copy and paste the files you have downloaded above to the just formatted flash drive. Make sure to copy and paste both the failsafe and the reinstallation package. Remember: copy and paste, don’t drag and drop.
- Armed with the flash drive, go to your car and start it in ACC (accessory) mode (a single push of the Start Engine button).
- Assuming you have followed, to the letter, the “key considerations” above the next thing is to enter the recovery. This is done by pressing, simultaneously, the music button, the favourite button and the mute button.
- The car’s infotainment system will go into the recovery/software update screen. This screen will show up:

- In the resulting screen, if your touchscreen is working then press 3 on it. This is the read AV DTC command to see if there are any stored error codes that need clearing. Press ENTER on the screen. If using the knob, two presses to the right should take you to command 3 (it will show there). Then press ok to activate it.

- If using the touchscreen and a number of errors have been listed, just press CLEAR on the screen to clear them. If not using the touchscreen, a single press to the left should take you to command 2. Press ok to activate it and clear the error codes, if any. If there are no error codes shown when you run command 3 then just proceed straight ahead to the next step.
- If using the touchscreen, press 99. This starts the software update process. If not using the touchscreen then just press the centre knob to the left (like 2 or 3 times depending on where you were previously) until you see 99 on the screen. Press ok to activate that command. This will start the software update process.
- Click OK/agree on any resultant prompts until you see a listing of the contents of your USB drive.

- Scroll down to the failsafe package and click on it. Agree to have it installed. Wait for it to be installed and finished.


- When the failsafe package has been installed, you may be taken back to the default MZD Connect home screen. Get back to the software update process by following step 3 (press music + fav/star + mute) then jump to step 6 (run command 99). Now, scroll down to the reinstall package and click on it. Agree and wait for it to install.


- Follow the update process onscreen. This will take some time. As noted below, please note the recommended intervals needed to keep the car “awake” during the update process.
- Once complete, you’ll be notified. At this point, turn off the car with a double press of the engine start/stop button. Wait for about 2 minutes, start the car in ACC mode again and confirm that the changes are as you intended. Voila!
- Repeat this process if you are doing a multi-step software upgrade process i.e. moving from, say, version 3x to 5x and then 5x to 7x or something like that.
A few things to note:
- Though not stated above, it goes without saying that before starting the outlined steps, the USB drive you’ve prepared above should be plugged into either of the ports in the armrest.

- It’s recommended to have a stopwatch (you can use your phone’s clock app) when starting the update process so that you can keep track of the 20-minute intervals where you’ll be required to either open and close any of the doors or step on the brake pedal so that the car does not enter sleep mode and bungle the update process. This is very important.

- At no point during the software update process should you turn the engine on.
The hardware
This is the easy part.
Just buy a USB adapter hub (Mazda part number TK78-66-9U0C) from your trusted online store or wherever else you can find it. I got mine from AliExpress (that means an importation process and whatnot – but it’s easy since M-Pesa allows you to pay for stuff on AliExpress. Choose standard shipping on checkout and wait). What you need to make sure is that the hub comes with all the correct cables in the box.
The next thing you need to do is to install the hub (I recommend that you let a professional technician, preferably one that knows their way around Mazda cars, do this – check out my thread on Twitter) and then plug in a compatible (high-speed data) USB cable into the necessary slot on your newly installed hub, pair it to your (Android) phone, setup Android Auto on your infotainment display and be on your way (this song sounds even better on those car speakers).